Gift Idea: American Girl Doll Sleeping Bag

american girl doll sleeping bag tutorial

We have friends who have twin girls who recently turned 9.  I have seen the girls a few times with American Girl dolls and for their birthday they asked to go camping.  So, I thought, why not make the dolls sleeping bags of their own so that the next time the family goes camping the dolls can get in on the fun too?

I did a quick search online to see what else had been done before and to find out the dimensions needed for 18″ dolls.  I came across a few sites but used this one as my main resource.  I followed the dimensions but didn’t follow the directions completely.  Although, maybe I should have since mine ended up being a bit bulky at the bottom corners.

american girl doll sleeping bag tutorial

Basically, I cut out my two rectangles, sewed around the edge with right sides together.  (I used fleece for the inside and cotton for the outside.)  I turned it right side out and then folded it in half so that the fleece was on the outside.  To sew the open hole closed (that I used to turn the bag right side out) and turn the long rectangle into a sleeping bag all in one motion, I just tucked in the fabric at the hole and then sewed along the edge of the bag from about half way down and then across the bottom.

Then I just turned what now looks like a sleeping bag right side out so the cotton fabric was on the outside and it was finished.  I think the version I linked to is probably less bulky the way they did it but if I read the directions correctly it seemed you would see the raw edges of the seams on the inside of the bag which I didn’t want.

To help visualize what I just wrote here are some very basic drawings.  Hope they make it a little clearer.

sleeping bag tutorial step 1

sleeping bag tutorial step 2sleeping bag tutorial step 3

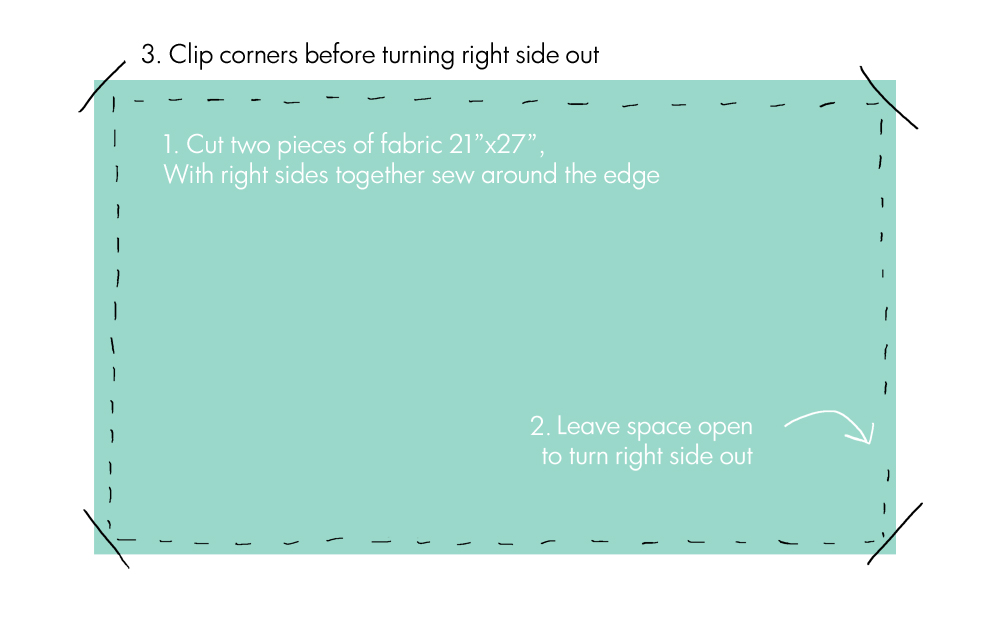
For the pillows I cut two rectangles of fleece 5″ x 6.5″.  And you just sew around the edges with the fabric right sides together.  Clip the corners, turn right side out, stuff, and then do a ladder stitch to close the opening.

I am pretty terrible about putting off sewing things until the day before they are given (even though I may have planned it and gotten the supplies well in advance) so this was a great project for that since you can’t get much easier than sewing some rectangles together.  The hardest part for me was finding some fabric in my stash that was big enough and I thought might fit their personalities.  The twins are very, very identical in their looks and general preferences but their dolls are not so I decided to give them different looking sleeping bags.

sleeping bag for 18 inch doll

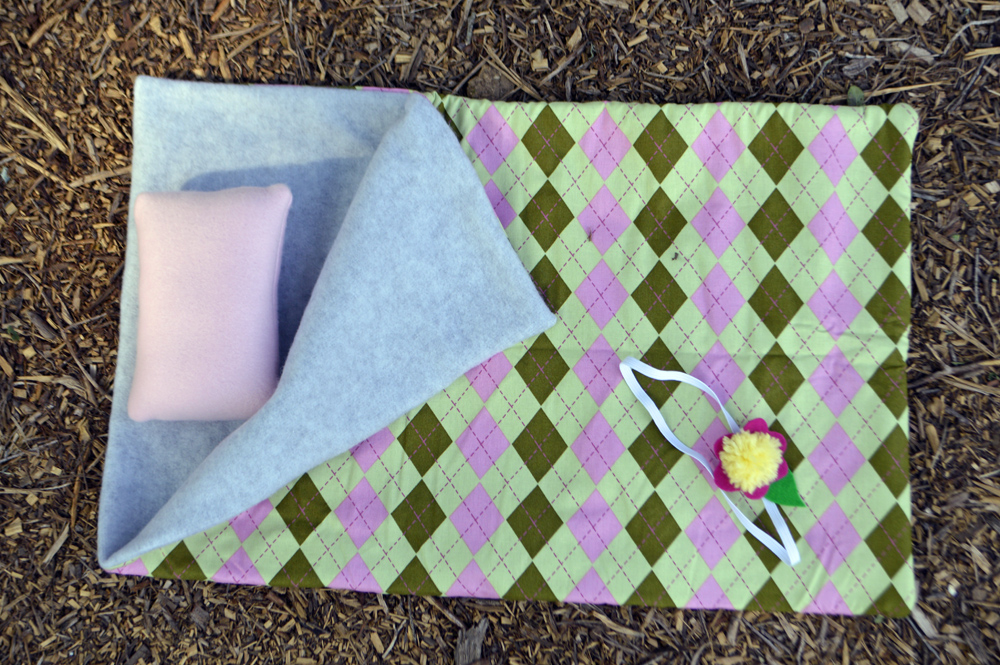
To spruce up the look of the bags with a practical way of keeping all the pieces in place when not in use, I also sewed a piece of elastic in a loop (to figure out the size needed I just put the elastic around the rolled bag and pillow with a little bit of overlap) with a pretty flower on it.  If I had had my thinking cap on I would have sewn the elastic into the bottom seam of the bag like a real sleeping bag (like I showed in the instructions above) so that the elastic would always be attached and not get lost, but I didn’t think about it until I had finished the first one and I didn’t want the bags to be different in that way.

I cut out a flower and leaf from felt and made yellow yarn pom-pom and hand sewed them onto the elastic to hide where the two elastic ends met.

american girl doll sleeping bag diy
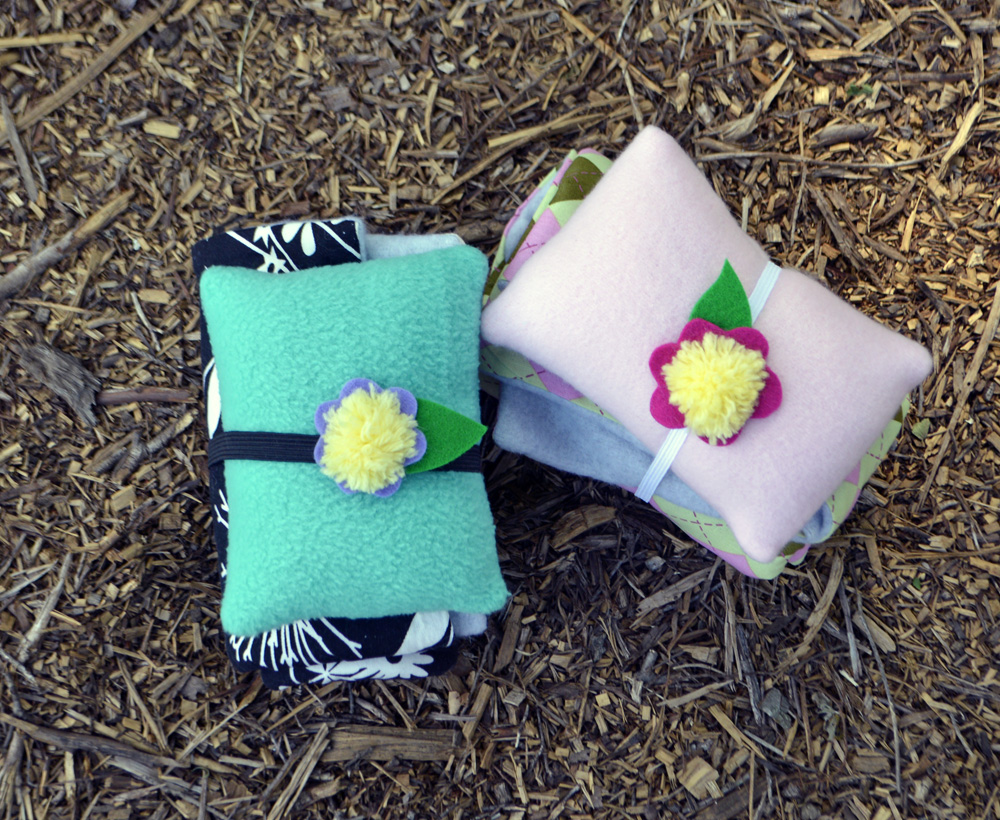
I thought they turned out very cute and I loved the extra detail of the flower on the elastic.  It really made it look extra special.  I didn’t have a doll to try them on so I hope they fit, but hopefully they were fine.

This is a great sewing project for beginner sewers.  Please feel free to ask for any clarification if my instructions weren’t clear.

Does your household have any American Girl dolls in it, or other 18 inch dolls?  Have you made anything for them?  What are some other ideas that are cute and easy to help accessorize them?  My daughter is a bit young for them but I’m sure there will come a point when she’ll be into them.


DIY Megatron Transformers Costume

I had told myself I’d get this post written before Thanksgiving.  Well, it technically is Thanksgiving right now, but I still haven’t gone to bed yet so it doesn’t count, right!?

The last costume this year was Megatron from the Original Transformers cartoon.  He is head of the Decepticons (bad guys) and transforms into a gun.  You can see the Peter Pan costume I made here and the Tinkerbell costume here.

My oldest could not commit to a costume idea this year.  He changed his mind every hour.  Finally, he was pretty set on being Megatron.  I was really hesitant to do it because he only wanted to be the “old school” version and all the premade costumes from the store were for the newer cartoons.  And the DIY ones I was seeing were to be made out of boxes which would be too cumbersome.  But, I finally gave in when I saw these two versions here and here that looked more comfortable to wear.  I was so ready to just buy anything from the store though since the hospital time got us so behind but he had his mind set.

DIY Transformers Costume from The Nesting Spot

DIY Transformer costume

It wasn’t hard to make but it did take a lot longer than I expected. I also ran out of duct tape the night before Halloween and then a big flood came and I was trapped at home and couldn’t get to the store to buy more.

Let me pause here to say a huge thank you to Judy who saw me comment on Facebook that I wouldn’t be able to get to the store to get the supplies I needed and within about 10 minutes delivered to my door foam, duct tape, and ribbon!  What a miracle she was!  The costume would not have been finished without her help.  I just couldn’t believe she had the supplies I needed and happened to live on this side of the low river crossings.

DIY Transformers Costume from The Nesting Spot

DIY Transformers Costume from The Nesting Spot

The whole thing is made from foam, cardboard, duct tape, masking tape, hot glue, and elastic.

DIY Megatron Costume from The Nesting Spot

First, I made the chest and back pieces.  I cut two pieces of cardboard after measuring the width of his shoulders and the height of his chest.  I hot glued little pieces of  cardboard on it to give it dimension to give the appearance of buttons.  It also made the cardboard stiffer because the piece wasn’t completely flat so it kept it from bending at the creases.  I carefully laid the tape down so as to minimize lines showing.  I put black electrical tape on the lines going vertically.  The red, blue, and yellow buttons are masking tape that I colored with marker.  I found an image from Google of a Decepticon symbol and put it in Photoshop to color it purple because it was originally black when I got it.  I used clear packing tape to put it on and keep it safe.
transformers chest piece

I ended up using the duct tape for the shoulder straps. It kept it very flexible and light weight. I put two pieces of tape facing each other and then taped that to the back of each cardboard piece.

Megatron chest piece

Back of Megatron chest piece

I used an old tube from a paper towel roll and covered it in duct tape to use for the gun barrel that comes up behind Megatron’s back. I put a bit of foam around the top and covered with tape as well just to add some interest and make it look less like a tube. It did make that side of the costume a bit unbalanced but it didn’t lean too much as to be a problem.  As you can see below I also used smaller pieces of cardboard underneath the tape to create texture and make it look more robotic.  I just used more duct tape to carefully lay over the tube to hold it down on the back.

back of Megatron

Next, I made the arm bands and legs bands. I wanted to give him a bit of a boxy look to make him look more robotic but not compromise his movement. At first my plan was to make the foam go all the way around his arms and legs so it would stay on easily but when I made the first one it ended up being too tight and too difficult to cover with tape. So, I tore off the back piece of foam and then just used duct tape and elastic to help hold it on. So, it wasn’t as neat looking as my original version but it did the job and he liked it.

I measured the length and width of his arms and legs to figure out the size I wanted to make it all.  I then made a paper pattern so I could hold it up to him and test the size before cutting into the foam.  I traced the pieces with a sharpie on the foam and cut them out.  Next, I hot glued the pieces together.  The glue didn’t want to stick at first but if you hold them together carefully while the glue cools it will stick.  The tape also doesn’t like to stick very well to the foam but once it was overlapping with more tape it stuck well enough.  All of this was a bit of a surprise and part of what made the process take longer.

One tip on covering the foam with tape was to cover all the vertical edges and ends first and then use big pieces horizontally across the front and back to cover up all the little pieces of tape to make it look nice and neat.  It was hard to get it to cover corners well but I just cut the pieces of tape smaller and carefully laid them in place.

arm and leg bands

On Megatron’s right arm is a big black barrel that I guess is the gun sight.  So I used another paper towel roll and covered it in black electrical tape.  I then laid about 5 strips of black tape across the barrel and onto the arm band to hold it on.  And then to hide that tape and to secure it better I laid duct tape going down the length of the arm.

megatron arm band

Megatron arm band

I tested out a couple ideas for holding the arm band on and ended up using the duct tape again by laying two pieces on top of each other and then taping them to the inside back.  This helped hold it onto his arm well.  On the arm band with the scope I added a couple pieces of elastic but it probably wasn’t necessary.  I also put a piece of elastic (the white one) at the top of each arm piece for him to put his hand around.  It started to come off on the one arm band during the Fall Festival so I just yanked it off and never put it back on.  I could’ve fixed it but didn’t seen too necessary so I didn’t worry about it.  That’s why only one of them has it in the photos.  I also just noticed in the photos that his hands are pulled in a bit and hidden but normally they are sticking out so you can use your hands.

top view of arm band

For the legs I ended up just making a front piece and a foot piece.  I covered them with duct tape and then used a strip of tape to attach the two.  That allowed it to hinge and just rest on top of his foot.  I thought about leaving the foot part off altogether, and in fact now that they just play with it at home we did take that part off just to make it easier for them to walk.  I ended up adding elastic but then tying to behind his leg so he didn’t have to slip it over his shoes.  My original idea was to use gray ribbon but I didn’t have enough of it and with the flood couldn’t get more so I just went with what I had.  The perfectionist part of me just had to ignore that it was easy to see it.  Note: All of these pictures are showing the lines and layers of tape much more than in real life.  But it is helpful for seeing how I laid the tape down.

Leg bands for Megatron

Lastly, I made the helmet.  It is pretty comical looking because of its size but I was using what I had.  We  bought foam years ago for a mattress pad for a baby bed and there was still some left over.  It was 2 inches thick so it made the whole head piece really large.  You could make it much thinner though by just using skinnier foam.  I will write a post about how I made the helmet soon because I actually did take some process shots of that.  The kids love the helmet though and it still gets worn a lot.  There has never been any questioning by them of the size.  I love that about little kids, they don’t care that it isn’t perfect or exactly like the original.  They are just happy to have something to help them imagine being another person.

Megatron helmet

Back of Megatron's helmet

And finally, as the base of the costume I bought a gray shirt and pants at Target.  Thankfully, they had both that were plain and so I didn’t have to go searching all over the place.  He’s worn both at different times already so I’m happy that that money wasn’t wasted.

Over all I was very happy with how it came out and thrilled that he loves it so much.  He already started saying he wants to be another transformer next year….uh, I don’t know about that.  Even little sister wants to be one too.  So glad we have a year to decide.

DIY Transformers Costume from The Nesting Spot

DIY Tinkerbell Costume

Well, these posts are taking longer than I’d hoped, but now that we made it past Josiah’s 6th birthday party I’ll try to speed things up.

I’ve already written about my littlest Peter Pan costume here.  Now it’s time to talk about Tinkerbell.

DIY Tinkerbell Costume from The Nesting Spot

While Josiah took to the last second to make a decision on a costume, Audrey knew from the beginning that she wanted to be Tinkerbell.  I figured it would be easy enough since she looks like her.  I think she turned out pretty cute if I do say so myself!

DIY Tinkerbell Costume from The Nesting Spot

DIY Tinkerbell Costume from The Nesting Spot

I wanted to try and make something that looked like the actual Tinkerbell from the different movies, not just a green tutu dress that is Tinkerbell inspired.  I looked around the web for tutorials or pictures to help.  I did find some handmade costumes for sale that looked like I wanted but didn’t find any tutorials.  Ken and I were at JoAnn’s and I was looking around at all their green fabric to see what could work.  I wanted something comfortable.  I found some green knits but nothing quite light enough.  Then I saw another pretty fabric that was a shimmery and looked like leaves because of the texture of it.  In the newer Tinkerbell movies her dresses are made of leaves so I liked copying that.  The fabric was a bit sheer though so I bought the knit fabric to go under it.  I figured extra layers would help keep her warmer in this minimal dress as well.

diy tinkerbell dress from The Nesting Spot

I used another sun dress that she has as my reference for size.  I made the under layer first.  It is very simple with just front and back pieces.  I cut it long so that I could cut the bottom later.  I really didn’t want to end up with it being too short.  The top layer I made using four pieces.  I really just made it up as I went and kind of winged it.  I was inspired by this.   I did use her measurements though.  I also had to try both layers on her a couple times and take in the sides or make other adjustments to make it just right.  After getting the two layers the way I wanted I put them on her again to measure how much tulle would be needed for the straps.  Tinkerbell’s dress doesn’t have straps but we’re not doing that on a 3 year old.  I did want to give the illusion a bit though so I bought a quarter yard of nude colored tulle for a few cents at Hobby Lobby.

Note: You may notice a crease in the different parts of the dress.  I’m assuming that is where it was folded on the bolt.  I prewashed both green fabrics and am surprised it didn’t come out.  I really wasn’t paying attention to it and didn’t notice it until I was finished.  I don’t know if that kind of fabric can be ironed or not.  If you know tell me in the comments.  But really, it wasn’t too noticeable in real life.

tinkerbell dress sized from sun dress

tinkerbell dress straps

I pinned the two layers together and the tulle in between them as well.  I also tried it on her to make sure I was putting the straps in the right place.  The dress is FAR from perfect if you look at the seams closely but I try not to worry too much about a costume that will only be seen a few hours.  After it was all pinned I sewed two  rows around the top and backstitched over the straps to make sure they were extra strong.

Finally, I put it back on her and just needed to measure how much to cut off the bottom to make the skirt with the cutouts.  I debated sewing the layers together or doing other things but ended up just not worrying and just cutting the two layers to match (although they often lay in different positions when she moves).  I just kind of eye balled it.  I was afraid that the top leafy layer was starting to fray so I did a zig zag stitch close to the edge all the way around just to keep it from fraying too far.  I kind of liked the added detail.  Knit doesn’t fray so I left it alone.

tinkerbell dress

Surprisingly, the hardest thing for me to find was the wings. I looked everywhere….at least twice.  Finally, I ended up accidently seeing at the 11th hour that a local gift shop was selling Halloween accessories and I popped in to find that they indeed had angel wings for only $3.50!  I had been seeing every type of wing imaginable in my quest for good Tinkerbell wings but they were every other color of the rainbow.  I also saw some really awesome fairy looking wings but they were around $18.  Um, no.  Can’t do it. You may be asking yourself why I didn’t just make some.  Well, I could have but I really just wanted to keep this simple and not go through the trouble of trying to form coat hangers and get the panty hose to work etc.  I just figured this would be an easy short cut. Who knew it’d be so hard?  But in the end the angel wings (with halo) worked great.  They definitely looked more to me like fairy wings than angel wings.  I did bend the corners of all four wings though to make them a bit more pointy and fairy-like.

tinkerbell wings

Because there was such a large piece of cloth in the middle of the two halves I wanted to disguise it a bit so it wasn’t so obvious that it was fake wings on her back.  I wanted them to look like they were just coming out of her dress…you know, like a really fairy would.  I also didn’t want to use the arm straps that came with it because that would detract from the look.  I didn’t want to cut the straps off though so that when Audrey plays with them later at home she can just slip the wings back on.

tinkerbell wings

So, I used a scrap of fabric leftover from cutting the top dress layer and just wrapped it around the middle a few times and then safety pinned it down.  Then I just slid the straps under the cloth and they stayed put.

tinkerbell wings

I safety pinned the wings to the back of her dress.  I actually didn’t do this until we got to the Fall Festival because wings and car seats don’t mix.

tinkerbell dress and wings

Tinkerbell wears huge pom-poms on her shoes.  These are super easy to  make.  I grabbed some white yarn that I already had and cut out a piece of cardboard to wrap it around.  Choose the cardboard width to be half the diameter of the finished pom pom.  There are tons of tutorials online on how to make them.  Here is one.

Tinkerbell shoes and pom poms

At first I had trouble figuring out how I would attach the pom poms without hurting the shoes.  But then I had a flash of brilliance and remembered some barrettes I had bought long time ago to use for something else.  Thank goodness for hoarding supplies!  I simply used another long piece of yarn, tightly tied it around the center of the pom so you couldn’t see it and then tied it to the barrette.

pom pom clip diy

Then all we had to do was clip it to the top of the shoe.

tinker bell pom pom

I had been going back and forth about what she should wear for shoes.  Tinkerbell wears green shoes but I don’t see those often and wasn’t sure how to make them.  Finally, I decided that she could just wear some brown mary janes that she has but I was staring at her new gold shoes and thought that even though they aren’t true to the movies, they were fairyish and would also be comfortable for lots of walking.

tinkerbell shoes

And I think they turned out pretty cute!

At the last minute before we left I finally had a chance to look up how to do a sock bun. I had heard of them but hadn’t never seen how one was actually done before. I watched the first youtube video that popped up on Google and it looked very easy. I found an old sock that had no mate, cut it and started wrapping it around Audrey’s hair. First of all, it is always hard for me to pull her hair back because of the way her hair lies. It does not like all going back in one direction. Lots of lumps happen. Second, her hair is still very thin so it really wasn’t enough to fully cover the sock and it kept trying to slide out all night. But I just kept tucking it back in and it looked good enough. For someone with fuller hair this is definitely an easy way to get the Tinkerbell hair look.  Oh, and this photo shoot was done after Halloween so her hair was done quickly just for the photos.  It actually was a bit better on the actual night.

Okay, well, about wraps things up. If you have any questions please ask! I hope to get the last costume written about before Thanksgiving. haha!

DIY Tinkerbell Costume from The Nesting Spot

DIY Peter Pan Costume

This year I made the costumes for my three kids for Halloween.  To get a closer look at each one, let’s start from youngest to oldest.Tinker Bell, Peter Pan, and Megatron DIY Costumes from The Nesting Spot

That means that first up is Peter Pan.

DIY Peter Pan Costume from The Nesting Spot

DIY Peter Pan Costume from The Nesting Spot

DIY Peter Pan Costume from The Nesting Spot

Amazingly, the only thing I bought for his costume were the shoes which I had been eyeing anyway and it just gave me the excuse I needed to buy them. All the other materials were already on hand from other projects. I love it when that happens!  It makes you feel okay about having a large stash of supplies.

Here are the pieces to his outfit.

I used this tutorial for my inspiration.  We also have a golden book of Disney’s Peter Pan so I looked at pictures in that as well.

DIY Peter Pan Costume from The Nesting Spot
For the shirt and pants I used a pair of his pajamas to make sure they were generally the right size. This worked really well for the pants, although they did come out a little more baggy than I had planned. But otherwise they fit him well and seemed to be very comfortable and easy to wear. To figure out the shape and sizing I turned his pajama pants inside out and laid them on top of the knit fabric which I had folded in half vertically so that I could make only two pattern pieces instead of four.  You can see an example of this here.  This saved some time with sewing and cutting and was very easy to do.  I had never sewn pants before but was very pleased with them.  After cutting out the two sides you sew the inseam of the legs, then the crotch parts together, and then hem the legs and waist.  Make sure to leave a part unsewn on the waist to insert the elastic.  You can see it done here.  This time I didn’t worry about making my seams pretty on the inside since this was just for a costume and knit fabric doesn’t fray.  I sewed these pants at around 3 pm on Halloween day so I didn’t have time to worry about them being perfect.

The shirt also fit him well once it was on, but I should have used a bigger shirt as the template because it was a pain to get on and off and was a little snug. Also, when the shirt is off, the sleeves look a little funny with the angle where they are connected but when on him you can’t tell at all.  I was kind of winging it.  In the past I have been more careful to trace some sleeves that were inside out to get the exact shape needed and they turned out great.  I was also looking at this post which gave me the idea to sew sleeves on instead of just making a shirt from one piece of fabric like seen in the first inspiration post.

The shirt was made from the same green fleece I used last year to make Yoda.  And the knit for the pants were left over from making the bottom layer of Tinkerbell’s dress.  I also had extra elastic on hand which was used for the waistband.

DIY Peter Pan Hat from The Nesting Spot

Here are some close ups of the hat and feather. I measured his head and looked at the shape from this tutorial.  You can see from the picture below that the feather is made from red felt cut in the shape of a feather and then hot glued to a skewer.  I used a red sharpie to color the skewer so it wouldn’t stand out.  The picture is also accentuating the glue, in real life it isn’t that easy to see.DIY Feather from The Nesting Spot

I cut a small slit under the bill of the hat to slide the bottom of the feather into and then glued the lower portion of the feather to the hat for stability. You’ll notice in some of the pictures that I sewed around the brim to make it stay up. I had tried to do it like it was done in the tutorial but it kept flopping down. He was also pretty happy to wear it most of the time so I didn’t bother with elastic to go under his chin.

DIY Peter Pan Hat from The Nesting Spot
Like I said earlier, the shoes are the only part that were store bought. They are from Target and are super cute. I wish they had had the largest size so that he could wear them a lot longer but we’ll get as much use out of them as we can before his little feet get too big.

Baby Moccasins

Peter Pan Feet
It was fun making his costume and I was so happy when it actually fit him on the first try. He was so cute with his sister although a lot of people asked if he was Robin Hood…so I guess you could make the same costume for that if you wanted. Oh yeah, almost forgot, at the last minute I remembered he needed a belt and I had seen a brown ribbon in my stash earlier so I grabbed that and just tied it around his waste. I had also intended on making him some sort of knife but I was so distracted by making the other costumes that I totally forgot.  Josiah had been given a short light up sword while in the hospital so I let him hold that.
DIY tinkerbell and peter pan costumes - From The Nesting Spot

Next up will be Tinkerbell. If you have any questions about how I made the Peter Pan costume please feel free to ask. Or if you have made your own I’d love to see it! Please share the link in the comments.

Yarn Wrapped Trash Can DIY

I’m continuing to knock out projects for the new big kids room.  This one was a super easy one but very gratifying.  I have had this trash can for about 10 years.  I bought it on clearance at Target when I first moved to town.  It was cheap and fine enough.  It has been used in our guest room and now in Audrey’s room.  But it is a bit on the girly side and a cream color which are two things that wouldn’t be ideal for this new room setup.  I didn’t want to spend more money on one and remembered seeing lots of blogs lately that have wrapped yarn or twine around vases (and pretty much everything else)  to spruce them up.  I figured I could do the same thing with my trash receptical to make it a little more fun and young.

Here is what it looked like before.

I was able to use supplies that I already had so this project was free!  Nice!

I was inspired by this yarn wrapped lamp shade and picked out 3 colors of yarn.  I used Aleene’s Original Tacky Glue which is good for fabrics since the trash can is covered in fabric.  I also used a foam brush and paper plate to apply the glue.  I meant to time how long it took but forgot.  We were watching a movie and with taking a snack break and bathroom breaks…yes multiple since I am now 9 months pregnant, I think it took between 30 minutes to an hour from start to finish.

I started from the top and spread a layer of glue all the way around.  I started the end of the yarn where there was a seam on the cloth of the can.  I took it slow in the beginning to make sure it was sticking.  The glue was very think and tacky but I think that helped to make it stay put.  I could have added water to make the glue go farther but figured the tackiness would be better.  The piece of trim around the top was the most challenging part.  It would have been too hard to try and remove it so I just went over it and thought it would just give some interest to the can.  It ended up being harder for the yarn, especially because the orange I used was a thinner yarn, to cover it up and not slide down and leave gaps.  Here is a picture of some of the gaps and how I tried to fill it in at the end with some extra pieces of yarn.  It helped but doesn’t look as nice as if it had been just  smooth all the way down.  I need to go back and glue that end down better where the white arrow is so it is less noticeable.

Another tutorial I read said that they found it easier to turn the vase upside down once they got it started.  I ended up doing that about half way through and I think to does look better where I did that.  I think it went a little faster as well.

All I did was continue to spread more glue all the way around about an inch or two down until I covered that glue and then I added more so that it wouldn’t dry on me.  I wound the yarn around and then would push it up (or down when the can was upside down) to make sure it was right up against the previous layer of yarn.  It went very quickly.

I liked the look of how the lamp shade alternated the yarn when switching to a new color and so I tried to do the same.  I kind of made it up as I went and it looks fine enough but upon close inspection you can see it isn’t perfect.  But it is just a trash can so I’m ok with that!  I made the transitions when I would cross over the yarn at the back where that seam was so that it could all be hidden at the back.

I took a picture of the bottom of the can so you can see how I finished it.  The bottom curved under so I just followed it and stopped where the cloth ended and there was a little plastic lip.  The yarn wanted to pull in since it was wanting to slip on the curve and pull inward but I just went slow and didn’t pull the yarn too tight and it covered it nicely.

So, here you go, zero money spent and under an hour of time while watching The Bourne Identity and we have a new, happy trash can!  Not too bad.  I definitely love it way more than when it was the other way.  Makes me want to start wrapping all kinds of things in yarn.  I’ve considered wrapping an ugly plastic pot we have a plant in.  Not sure what glue would be best though.

So, have you wrapped anything in yarn lately?  Have anything that could use a little sprucing up?

Diaper and Wipes Clutch DIY

Remember when I told you about this “poopy clutch”?  In case you’re wondering what it is, it is a little clutch to hold a couple diapers and wipes so they all stay together in your bag or purse.  I made one a while back but ended up giving it away as a baby gift with a set of burp cloths and a soctopus I made.  So, it was time for me to make another one just for me.

Once I bought the supplies, putting it together was super easy.  I printed out the free pattern, traced it on the back of my vinyl with pencil, cut little holes where I wanted the button stud to go using my seam ripper, screwed the button stud through the 3 layers, and then cut a little slit in the top where I wanted it to slip over the button.  That’s about it if you want to leave it as is. I decided to spruce mine up a bit since the vinyl I got from the remnant bin is a kind of boring tan color.

The first one I made I painted a turquoise feather on the front flap and also on the back.  The second one I sewed on a leather feather to the back.  I also sewed a top stitch around all the edges to give it more interest.

Here’s the original clutch.  You can click on the picture to get to the pattern.

I had hoped to find a button stud locally but none of the stores had any.  I looked online but all the places I saw at first had each stud valued at around a dollar or more each with shipping being a few dollars.  That seemed a bit crazy to me.  Thankfully I did find a guy on etsy where I could buy a 10 pack of the studs and also the leather I used for the feather for much cheaper.  Plus, since I bought both together it made the shipping cheaper.  The studs were $5 with $4 shipping so that made each stud less than a dollar…much better than around 4 or 5 dollars for just one.  So, even though I didn’t need 10 at the time they are easy to use and I’m sure I’ll be making more things with them.

Oh, and if you wondering, sewing through the vinyl and the leather were both wonderfully easy.  My sewing machine originally came with a few different types of needles and so I used the most heavy duty one of the bunch and it sewed through it all like it was butter.

One last modification I made was that I glued the bottom flap to the two side flaps using E6000 glue (that stuff glues anything!) because it does shift around a lot. I think in doing that I also made it so that it’ll hold a little less but that is ok because I don’t want something too bulky.  Besides, little baby diapers are super tiny and cute anyway.

Here’s my version.

Reusable Pocket Advent Calendar

Drum roll please……..

Here it is!  It’s the advent calendar that I FINALLY got to check off my list!  Thankfully, I won’t have to make one next year since it is reusable.  I can just come up with some new cards to insert into it.

We’ve loved it so far.  Everyday my son asks if it is another special day.  I tell him Yes! and we go check what the new day brings.

I took different ideas from the calendars I showed you on this post.

Some of my favorite parts that I took and put together to make mine were:  bright, happy pockets; using a strip of fabric instead of individual pockets to make it faster to sew; the spunky pom-poms hanging down; the dowel rod hanging in the tabs; and the numbers stamped across a ribbon on the front.

I loved the twill ribbon that was used to give a solid color for the numbers to be stamped on, but I was trying to make this quickly and my very limited fabric selection in this town (Hobby Lobby) didn’t have any.  So, I bought some white grosgrain ribbon and a fabric marker.  I didn’t want to spend the money on numbered stamps that wouldn’t get used much.  I tested writing the numbers on the ribbon and it bled REALLY bad.  So, plan B.  I looked in my tub o’ miscellany and found some red double bias tape.  It was too thin so I ironed it out flat to make it just single bias tape.  I was a bit afraid though to make the plunge and write on it after I went to all the trouble to sew the calendar.  What if I mess up on one of the numbers?  What would I do?  So, I still have the option of writing numbers on later, but in the mean time I just wrote numbers on each piece of paper.  And it has worked out pretty nice because each day after I read the card I just turn it around backwards so that we can see exactly where we are on the count down.

I didn’t take pictures while miniacally trying to get this project finished a day before December but I’ll give you a rundown of what I did if you’re interested.  If not, scroll down and I’ll share our list of advent activities.

I used a white cotton that was in the same section of the store as the canvas material.  I wanted it to have a heavier feel to it.  The patterned material was in the holiday section of the cotton apparel fabric.

I cut the 6 pockets to be about 7×15 inches.  The background piece was cut 15×52  inches.   The 2 tabs are cut 5×10 inches.

I sewed the pockets first by folding them in half like a hotdog and sewing right sides together.  I then turned them right side out and ironed them.

I didn’t feel like sewing all the bias tape so I used some fusible webbing I had on hand to iron it all on.  You can do it either way.   Make sure to cut the ribbon or bias tape a little longer than the pockets so you can fold it behind the pocket for a cleaner look.

Next, I sewed the pockets onto the white fabric.  I folded the white fabric in half like a hamburger and had it sitting so that the fold was at the bottom.  You want the top to be open so that you can sew your tabs up there when you sew it all shut.  The pockets are each spaced one inch apart.  I left a little more room  above the top pocket row, about an 1.5 inches, because I needed room for my paper to stick up.  Pin the pockets on.  I had had the pocket fabric facing so that the folded side without the seam is at the top.  That will give the cleanest look.  Sew the pocket to the white fabric by going around the sides and bottom of each pocket strip.  This will also sew the hole closed on each pocket from when you turned it right side out.

Next, sew the 3 lines about 3.5 inches apart to make the individual pockets.  I used a ruler and a disappearing ink marker to make a dot at the bottom and top of each pocket so I would sew a straight line.   I sewed starting from the bottom of the pockets up to the top.  This helps the presser foot not get caught on the open side of the pocket.  My very most right pockets are slightly larger than the rest but not enough to worry about.

Fold the tab fabric over like a hotdog and sew just the long side.  Turn them right side out and iron.

Now, you finally get to turn the white fabric so that it has sandwiched the pockets on the inside.  Pin the tabs to it so that they are on the inside of the calendar next to the pockets.  You should have the raw edges facing out and the loop facing inside.  If you pin it on so that it already looks correct it’ll be inside the calendar once you turn it right side out.  Sew all the way around the open edges leaving a hole open near the bottom so you can turn it right side out.  You will sew over the tabs at this point too.

Turn the calendar ride side out and iron it flat.  Sew around the entire edge.  This will close up the hole on the edge and make it look finished.

Cut a dowel rod and slide it in.  Mine is 14 3/4 inches long.  I just made it the same as my calendar.

You can hang it directly from the rod or from some ribbon or yarn like I did.

Done.

It took me probably around 3 hours total to make this.

I know it can be confusing to read instructions without pictures.  Please let me know if you have ANY questions.

It is a fairly easy project for someone with a bit of sewing knowledge and the rewards are big!  And you can totally personalize it to make it YOU.  If you ever make one, please send me a picture.

Here is our list of advent fun in no particular order.

Make cookies

Watch a christmas movie and have popcorn

Make salt dough ornaments

Paint salt dough ornaments and hang on tree after dry

Go to the Trail of Lights

Read a Christmas book (we’re doing this 4 days)  I put them on days that are really busy for us.  I’ll also put a little chocolate in the pocket on those days.

Play a game – we’re going to do candyland

Make ornaments for family (we buy ceramic and wood ornaments from hobby lobby every year for the kids to paint for all the grandparents etc.) I made this one go for 2 days since their attention spans are short.

Make candy/cookies for neighbors

Give cookies to neighbors

Drive around and look at lights in town

Make a fire and drink hot chocolate (or chocolate milk since the kids don’t like the hotness)

Go to the church choir concert

Go caroling with the church

Buy gifts for angel tree and wrap them

Unwrap one present before bed (chrismtas eve) and Christmas eve service

Go see movie muppet movie

Go to kid’s christmas party at church

Go to Sights n Sounds Festival

Read the christmas story from the Bible

Of course there are a ton more ideas out there on the web.  When the kids get a bit bigger I definitely want to do some more service type things to help others.  They’ll also be able to make their own christmas cards and gifts etc for others.

Tutorial: T-Shirt Super Hero/Heroine Cape Part 2

Now that you know how to make the easiest cape ever, you can spice it up a bit!

Let’s continue on to see how I added some flair once back at home.

For this you’ll need some more t-shirt material. What I had on hand were scraps from Ken’s old undershirts.  He cuts them up to use as rags.  He had recently made some new ones so I grabbed a couple that were still in pretty good shape.  You’ll also need some interfacing.  I used what I had on hand which is only one sided but if you buy two sided interfacing you won’t have to sew at all.

I decided to make my emblem a circle shape with a design on the inside so the color of the t-shirt could show through. You could make whatever your heart desires.  I found a round plate that I could use to trace a circle and drew right on the white shirt.  I have a handy marker for this very thing that has two tips.  On one side it only comes off if washed or gets wet and on the other side it slowly fades on its own.  I used the fading side.  If you don’t have one of those you could use a pencil.

I then free handed my design in the circle.  If you aren’t comfortable free handing something you could always find a shape or clip art online and print it from your computer to use as a template.  I tried to keep this as low key as possible, so free handing it was for me.

You can see on my star that I messed up a bit and redrew things with the knowledge that the lines would eventually fade.  I also waited to cut my design until after I had sewn it on the cape thinking it would be easier to sew it if it was just one piece of fabric.

Next, cut out your interfacing to match the shape of your applique.  I made mine just slightly smaller so I wouldn’t be fusing it to my ironing board too.  I was also using scraps so I just cut out what I needed to cover the circle.  I’m all about using what you have on hand.

Follow the instructions of your interfacing.  Since my interfacing is just one sided I put the bumpy side of it facing the back of the circle.  I got another scrap piece of shirt and got it wet and covered the circle and interfacing.

Next, I ironed it on with the iron set to the wool setting.  You are supposed to leave it on each spot for about 15 seconds.  You should see lots of steam and the fabric should become dry.  Keep doing this until you have ironed the whole piece.  If it seems it didn’t work enough on part of it just repeat the process.  Now, your design should feel a bit thicker and sturdier.

(Let me stop here, if you have two sided interface, after ironing one side to the design, cut out any of the pieces of design in the middle that you want your t-shirt to show through on now, and then next you peel off the paper and iron the design onto the cape per the directions.  And you could be finished with no sewing!)

I didn’t have that luxury so I had to sew.  I put my circle on the back of the cape where I wanted to end up and pinned it on.

I then sewed on the circle by following all the lines I had drawn.  I also sewed a circle close to the outer edge.  Note:  I used a ballpoint tipped needle to sew it since it is better with knits but I have sewn knits with a normal needle and it works too.

Cut all those extra pieces of thread on the front and back to clean it up.  Here’s a fun tip:  I have wanted to buy some really cute embroidery scissors but haven’t gotten around to it.  One day I realized I had seen some scissors in the house that were pretty much the same…I believe they are cuticle scissors?  I have never used them.  They came with a manicure kit I got as a gift years ago.  They work great for this purpose though.  I’ll probably still buy the other scissors though since they make me happy.

Next, pinch the fabric where you want to cut it out.  When not taking a picture, I pinched the back cape fabric with my left hand and the front applique fabric with my right to pull them apart.

I then cut a small slit in ONLY the top layer.  This allowed me to carefully cut out the unwanted sections.  Make sure the whole time that you are not accidently cutting the cape fabric too.

Now, stand back and admire your super cool cape and pat yourself on the back.

The very first cape I made I used one of Ken’s old shirts so the neck was much larger.  The original tutorial talks about cutting off part of the neck and then adding velcro.  But I didn’t have any velcro and since we all pull shirts on and off our heads everyday I realized it wasn’t really necessary.  So, I just cut off part of the neck and then sewed it back together.  Not the prettiest thing ever but it works.

I also tried making a cape without using interfacing.  Here is what it looks like.  As you can see it pulled a lot at the applique and made it really bunchy.  I’ll probably use my seam ripper and take it off and try again with interfacing.  I was also having huge issues with my thread tension which could have played a role in it as well.  I was so happy to finally figure it all out (it ended up being that I needed to tighten the bobbin holder..who knew?).

Now it’s time to enjoy those capes.  Or use them as aprons?

Please let me know if you have any questions or if I can clarify anything.

After a long day of being a hero sometimes you have to go home and rest.

Tutorial: T-Shirt Super Hero/Heroine Cape Part 1

Like I promised you last week, here is the simplest way I have ever seen to make a cape.  In its’ simplest form it requires absolutely NO SEWING!  Yea for that!  I had seen the idea at the beginning of this year but couldn’t remember where.  I thought it was the most brilliant idea and couldn’t wait to make one for my son.  I took the idea and changed it up a bit to fit my needs and what I had on hand.  Luckily, I found the source.  I saw it originally on MADE for Dana’s Celebrate the Boy Month and then clicked through to see the tutorial at The Southern Institute.  I just took her version and cut out a couple of steps.

All you need to start is: a t-shirt and scissors and/or a rotary knife with self healing mat.

To make it a little fancier we’ll need some more materials but I’ll get to that in a bit.

First, pick out the shirt you’re going to use.  Using a shirt for this project is brilliant because t-shirt material doesn’t unravel so you don’t have to hem it and it already had all the parts you need to make a cape.  If you want the cape blank, find a shirt that has at least the back blank.  If you have an old shirt that has a picture on it that you like you could use that as well.  The first cape I made for Josiah, I used one of Ken’s old shirts and had to cut and adjust the collar.  This time I used a youth sized shirt (size 14/16) which worked just perfectly.  Whatever you have on hand though should do just fine.

Since my shirt had a funny picture on it that made no sense to me, I planned on using the back.  (But thanks to facebook and some very cool and in-the-know friends, I now know that the shirts are for a band from San Marcos that is no longer around.  Thanks Valerie and Sharon!)

Lay your shirt out flat.

Cut up the sides with scissors and then pull the two sides apart.

Cut around the neck.  At this point I cleaned up my cutting a bit with my rotary knife but you don’t have to do that.  I also ended up cutting 3 inches off the bottom of Audrey’s so she wouldn’t trip on it.

If you are using a smaller shirt like me that has a smaller neck hole, you are finished!  Just slip it over your kid’s head and you are good to go!

I brought along two of these shirts with us to the beach and made the capes there in under a minute.  Both kids loved running around in them and didn’t care that there was nothing on the cape.  They didn’t know there could be anything added to it.


So much super power it is coming out his hair!

I put this tutorial into two parts because of its length.  To find out how to add some flair to the cape go here.